How to Toast Bread Without Butter: Practical Butter-Free Methods
Master three butter-free toast methods—toaster, skillet, and oven—with practical steps, safety tips, and topping ideas to enjoy crispy, evenly browned bread.

Goal: Learn how to toast bread without butter using a toaster, skillet, or oven. You’ll achieve evenly browned slices with a crisp crust and customizable browning. Choose your method, preheat properly, and watch closely to prevent burning. This guide covers three reliable approaches and simple toppings that keep flavor intact without butter.
Why you might toast bread without butter
According to ToasterInsight, butter-free toast can be just as flavorful as its buttered counterpart when you choose the right technique. Home cooks often skip butter to reduce calories, manage dairy concerns, or keep toppings flexible. In this guide, you’ll learn how to achieve a crisp, evenly browned slice using three reliable butter-free methods, along with practical tips that improve browning, texture, and taste. Whether you prefer the speed of a toaster, the control of a skillet, or the even heat of an oven, you’ll find a strategy that fits your kitchen and routine. The goal is consistent browning with a light crust while keeping the interior tender. With a little practice, you’ll know exactly when the toast is ready and how to finish it with your chosen toppings.
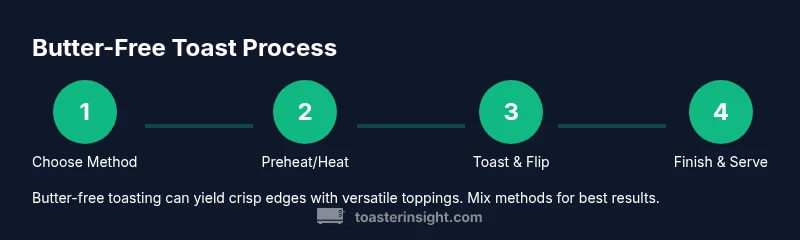
The three primary methods for butter-free toast
There are three common, reliable approaches to achieve butter-free toast: the toaster, the skillet (pan-toasting), and the oven or broiler. Each method has its own advantages: speed, control, or even heat distribution. The toaster is fastest for standard slices and does not require extra cookware. The skillet offers hands-on browning and a crisp edge with minimal equipment. The oven or broiler provides even browning for thicker slices or larger batches. Your choice depends on equipment, time, and your preferred texture. Remember that dry heat is key—no butter required—to encourage browning and a satisfying crust.
Method 1: Toaster—butter-free browning
Using a toaster to achieve butter-free toast is the quickest route. Start by adjusting the browning setting to a middle option to avoid under- or over-browning. Place the bread slices in a single layer without crowding, and run them through a standard cycle. If your toaster has multiple slots, rotate the slices between cycles for even color. When the browning looks even and the crust feels crisp to the touch, remove and rest briefly off the rack. For a crisper finish, you can run another quick pass on a light setting, but avoid overdoing it, as bread can burn quickly on the outer edges.
Method 2: Skillet or frying pan
Pan-toasting gives you tactile control over texture. Preheat a dry skillet over medium heat until it’s hot but not smoking. Place the bread slices in a single layer and let them sit undisturbed for 1–2 minutes to form a base crust. Flip carefully with a spatula and toast the other side until it reaches the desired color. If you want a slightly richer flavor without butter, a tiny drizzle of olive oil on the bread’s surface before toasting can help with browning and sheen. Keep the bread moving slowly to avoid scorching and check frequently as browning can vary with pan thickness.
Method 3: Oven or broiler
Oven-toasting is ideal for thicker slices or larger batches. Preheat the oven to a moderate temperature and set a rack in the middle. Arrange slices on a baking sheet in a single layer, spacing them to prevent steaming. Toast for several minutes, then flip and toast the other side until both sides are evenly browned. For broiling, place the sheet close to the heat source and monitor closely; broiling works fastest but demands careful watching to prevent burning. This method yields uniform browning and a softer interior if you prefer, with the option to finish under a brief broil for extra crisp edges.
Achieving even browning without butter
Even browning comes down to heat distribution and timing. Preheating the appliance ensures the surface immediately begins browning rather than steaming. In the toaster, choose a middle browning setting and avoid crowding. In a skillet, keep slices flat and rotate halfway through for uniform contact with heat. In the oven, space slices well apart and bake on a preheated tray. If you notice uneven color, consider toasting in batches or thinning bread slices slightly so heat penetrates evenly. For thicker bread, a shorter initial bake with a gentle finish works best to prevent a burnt crust while keeping the interior tender.
Flavor ideas without butter
Butter-free toast does not have to be bland. Try a light brush of olive oil before toasting for a glossy finish and extra browning. Experiment with toppings after toasting, such as avocado slices, tomato, hummus, or a savory spread based on olive oil and herbs. A touch of jam, honey, or a sprinkle of nutritional yeast can add sweetness or depth without relying on butter. If you’re avoiding dairy, dairy-free spreads or homemade avocado butter substitutes offer creamy texture without dairy ingredients. The key is balancing browning with your chosen topping so each slice retains its crisp edge and soft crumb.
Safety, common mistakes, and troubleshooting
Toasting bread without butter is safe when you follow basic kitchen safety: keep handles away from heat, use oven mitts, and never leave appliances unattended. Common mistakes include overcrowding slices, which traps steam and prevents browning, and using too high heat, which scorches the crust before the interior heats through. If your toast browns unevenly, rotate slices, adjust the heat level, or toast in smaller batches. Always inspect the toaster’s crumb tray and the oven racks after toasting to remove crumbs that could ignite. For extra safety, unplug appliances after use and allow them to cool before cleaning.
Cleaning and maintenance after butter-free toasting
After you finish butter-free toasting, let equipment cool completely before cleaning. For toasters, remove and empty the crumb tray, then shake out loose crumbs over the sink and wipe the exterior with a damp cloth. Skillet surfaces can be wiped clean with a paper towel and a light soap solution, then dried thoroughly to prevent rust. Oven trays and racks should be cleaned with warm, soapy water or run through a gentle self-clean cycle if your model supports it. Regular maintenance extends the life of your appliances and keeps flavors consistent across many batches of butter-free toast.
Tools & Materials
- Bread slices(Choose slices about 1/2 inch thick for best browning)
- Toaster(Use if you plan to toast butter-free in a toaster)
- Skillet or frying pan(Nonstick or cast iron works best for dry heat browning)
- Oven or broiler(Nice for larger batches or thicker slices)
- Spatula or tongs(Helpful for flipping and removing hot slices)
- Optional oil (olive oil) for flavor(Light brush on bread before pan-toasting if desired)
Steps
Estimated time: 10-15 minutes
- 1
Choose method and prep
Decide whether you’ll use a toaster, skillet, or oven. Gather the bread slices and the appropriate equipment, and clear space for safe handling of hot surfaces.
Tip: Know your comfort level with each method before starting. - 2
Preheat or warm the appliance
Preheat the toaster to a middle browning setting, or warm the skillet on medium heat for 1–2 minutes, or preheat the oven to a moderate temperature with racks in place.
Tip: A hot surface starts browning immediately, reducing steaming and soggy texture. - 3
Insert bread into device
Place bread slices in a single layer without overlapping. This ensures even exposure to heat and prevents crowding.
Tip: For the skillet, lay slices flat; for the toaster/oven, keep slices aligned with the heat source. - 4
Toast to desired color
Let the bread toast until the color matches your preference. Flip slices on the skillet if needed to brown both sides evenly.
Tip: Check frequently; butter-free browning can progress quickly on some surfaces. - 5
Remove and rest briefly
Carefully lift slices from heat and rest on a rack or plate for a minute to set the crust.
Tip: Resting reduces steam and keeps the crust crisp. - 6
Serve or add toppings
Enjoy immediately, adding toppings like avocado, olive oil, or jam after toasting. Butter-free does not mean flavor-free.
Tip: Apply toppings after toasting to preserve texture and control richness.
Your Questions Answered
Can you toast bread without butter in a toaster?
Yes. A toaster can brown slices without butter by using dry heat and the right browning setting. Avoid overcrowding and monitor the cycle to prevent burning. You can finish with toppings after toasting.
Yes, you can toast bread without butter in a toaster by using dry heat and watching the cycle. Don’t overcrowd the slots and adjust the browning setting as needed.
What is the best method for butter-free toast?
The best method depends on your setup: a toaster for speed, a skillet for control, or an oven for even batch browning. Each method can deliver crisp edges and tender interiors when used with careful heat management.
The best method depends on your kitchen. Toaster for speed, skillet for control, or oven for even batch browning.
Can I use olive oil instead of butter?
Yes. A light brush of olive oil can aid browning and add flavor. It keeps the toast dairy-free and enhances crispness without using butter.
Yes. A light brush of olive oil can help browning and flavor without butter.
How long does it take to toast bread without butter?
Timing varies by method and slice thickness. Typically, toaster or skillet browning lasts a few minutes, while an oven or broiler may take longer depending on heat level and batch size.
Timing depends on the method and slice thickness. Usually a few minutes for toaster or skillet, longer in the oven if needed.
Is butter the only way to flavor bread after toasting?
No. You can top butter-free toast with avocado, olive oil, hummus, jam, or herbs. These options add flavor and moisture without butter.
Not at all. Try avocado, olive oil, hummus, or jam after toasting for flavor.
How should I clean my toaster after butter-free toasting?
Unplug and let it cool, then remove the crumb tray and shake out crumbs. Wipe the exterior with a damp cloth. Regular cleaning helps maintain browning performance.
Unplug, let cool, remove the crumb tray, shake out crumbs, and wipe the exterior.
Watch Video
Key Takeaways
- Choose one butter-free method and stick with it for consistency
- Preheat surfaces to promote even browning
- Watch browning closely to prevent burning
- Experiment with toppings after toasting for flavor
- Practice yields reliable, crispy butter-free toast